


Picture a technician walking round a press with a sheet that says check belts. They tick the box. A month later someone else does the same round and ticks the same box. Neither wrote down what they measured, and neither could say what "checked" meant.
That is the weakness of a checklist written this way. It records that someone was there, not what they found. This article shows what a preventive maintenance checklist should hold, how to write steps that can pass or fail, and what to do when one fails. There is a free Excel template you can adapt for your own equipment.
What a preventive maintenance checklist is for
A checklist covers one asset at one frequency: the weekly checks on a press, say, or the annual service of a compressor. It records what was checked, what was found and what was done about it.
Keep it to one asset and one frequency. A list that tries to cover a whole line is hard to complete properly and hard to read afterwards.
The checklist is not the plan. The plan decides which jobs are due and how often. The checklist tells the technician what to do on each one. If you have not written the plan yet, start with our step-by-step guide to a preventive maintenance plan, then come back here.
Write steps that can pass or fail
Check the belt cannot fail. Belt tension within the manufacturer's tolerance can. A step the technician cannot fail is a step nobody will learn anything from.
Write every step with 4 parts:
- A check point: the part of the machine, such as belts and chains.
- A task: what to do there, in one sentence.
- An action: one word for the kind of work. We use clean, lubricate, adjust, replace, inspect, measure and function check.
- A standard to meet: what a pass looks like.
Here are 4 steps written that way:
- Guards and covers. Check that every guard and cover is in place and undamaged. The standard: in place, undamaged, and the interlocks stop the machine.
- Emergency stops. Press each one. The standard: the machine stops at once and resets normally.
- Belts and chains. Check tension and wear. The standard: within the manufacturer's tolerance.
- Hydraulic oil. Check the level and look for leaks. The standard: level between min and max, no leaks.
These are generic. Replace them with the checks your equipment and its manufacturer's manual call for. A pre-built list applied as it comes will miss what is particular to your machine.
Where a step measures something, leave room for the reading. "Within tolerance" is a result. The number is the evidence.
What the header and the sign-off need
Before the first step, the technician should know what they are about to work on and what it takes. Put these in a header:
- the asset, its ID, and the line or area
- the type of maintenance: predetermined, condition-based or operator maintenance
- the frequency, the date and the technician
- whether the machine is running or stopped during the checks
- whether isolation or a permit is needed
- the estimated time
Whether the machine runs during the checks and whether isolation or a permit is needed matter most for safety. If the job needs a permit, see why digital permits beat paper.
At the foot of the sheet, close the round with a sign-off: a completion code, the time spent, any downtime the work caused, and a signature. The completion code is what makes the history searchable later. You need only 4:
- OK: every step passed.
- Deviation found and follow-up raised: something waits for a later job.
- Deviation found and corrected: it was fixed on the spot.
- OK (change the routine or interval): everything passed, but the routine or its interval should change.
Completion codes let you answer a plain question without opening every sheet: how many rounds found something? Ragn-Sells, a Swedish recycling company, uses completion codes to see whether a job was done and whether it was approved without remarks. Lars Pettersson, their maintenance coordinator, says that when there are remarks, "we create a follow up job." You can read how Ragn-Sells uses completion codes in audits.
Use our free template
We built a preventive maintenance checklist in Excel with exactly this structure. Download the preventive maintenance checklist (Excel).
The file has 2 sheets. The first, "How to use", explains how to fill it in, step by step. The second, "Checklist", is the sheet you fill in:
- A header with drop-down choices for the type of maintenance, the frequency, whether the machine runs during the checks and whether isolation or a permit is needed.
- 9 columns: step, check point, task, action, standard to meet, reading, result, what was done and follow-up work order. Action and result have drop-downs, so every entry reads the same way.
- 7 example steps, with room for 20 rows. Replace the examples with your own checks before you use it.
- A sign-off with the 4 completion codes in a drop-down, time spent, downtime caused and 2 signatures.
The template records a round. It does not tell you when the next one is due, so keep your schedule wherever you keep your plan. Make one copy per asset and frequency.
What to do when a step fails
A checklist matters most on the day a step is Not OK.
For every Not OK, write what was done. If it was put right on the spot, say so and use the code Deviation found and corrected. If not, raise a follow-up work order and write its number in the last column. That number is what connects the checklist to the repair.
This is where paper checklists usually break. The Not OK is written down, and then nothing happens, because the next step is to find the right person, describe the fault again and wait. A sheet with a clear Not OK that nobody picks up is worse than no sheet: it proves you knew.
The sign-off also tells you whether the interval is right. If round after round comes back OK, the code OK (change the routine or interval) is how you say so. Then your routine follows what the machines actually need.
Where a paper checklist stops being enough
A paper checklist shows what was checked on the day it was filled in, as long as nobody loses it. It has 3 limits.
Nothing tells you the round is due. Someone has to remember, and someone else has to cover when that person is away. At Sunseeker, the UK yacht builder, around 25 cranes each need a service and a lifting inspection every year. Each crane is now an asset in the system with its recurring job attached, so when an inspection is due, the job appears automatically. The same system tracks Sunseeker's training records and sends a reminder when a certificate is due for renewal. Matthew Weeks-Johnson, their Machinery Maintenance Manager, explains that when the training officer is off, he can set someone else up to receive those reminders. In his words: "The system holds the information, not the individual." You can read the Sunseeker story.
A Not OK has to be typed in again. Someone turns it into a work order by hand, and some never get that far.
The history sits in a folder. To see how often a machine has failed the same check, someone has to open every sheet.
When Wilkinson Sword, the razor blade manufacturer, told its story, it showed where the gap was. Its maintenance team worked in a digital system, but machine operators still made their checks and entries on paper slips. The company saw the need to digitalise that too, so that operators could document their inspections digitally and the data could be analysed faster. Read the Wilkinson Sword story.
Where Maintmaster CMMS fits
We at Maintmaster built Maintmaster CMMS so that the checklist is part of the work order. A recurring job creates each round when it falls due, and the technician works through the steps at the machine, on a computer, phone or tablet.
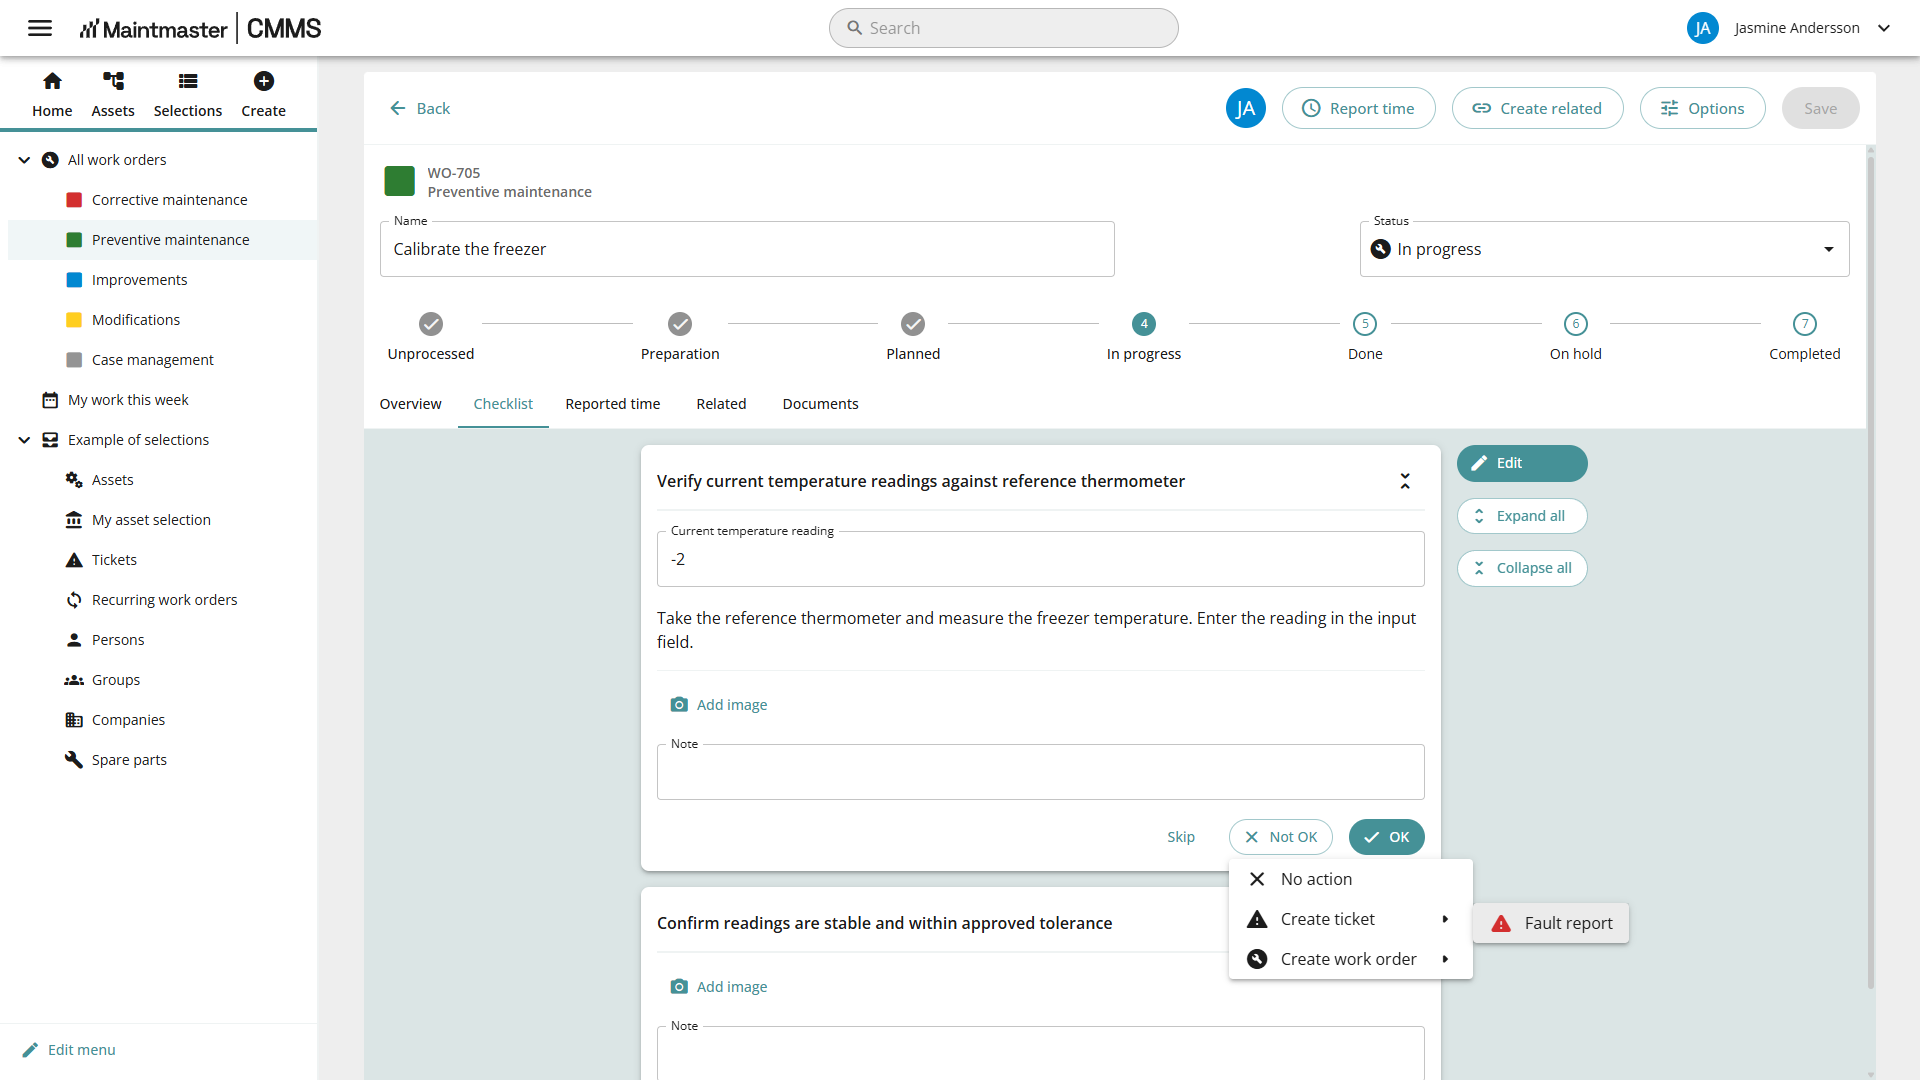
Each step holds what the paper sheet asks for. The technician enters the reading, adds a photo or a note if there is something to show, and marks the step OK or Not OK, or skips it. When a step is marked Not OK, Maintmaster CMMS can offer the next move on the spot: no action, a fault report or a follow-up work order.
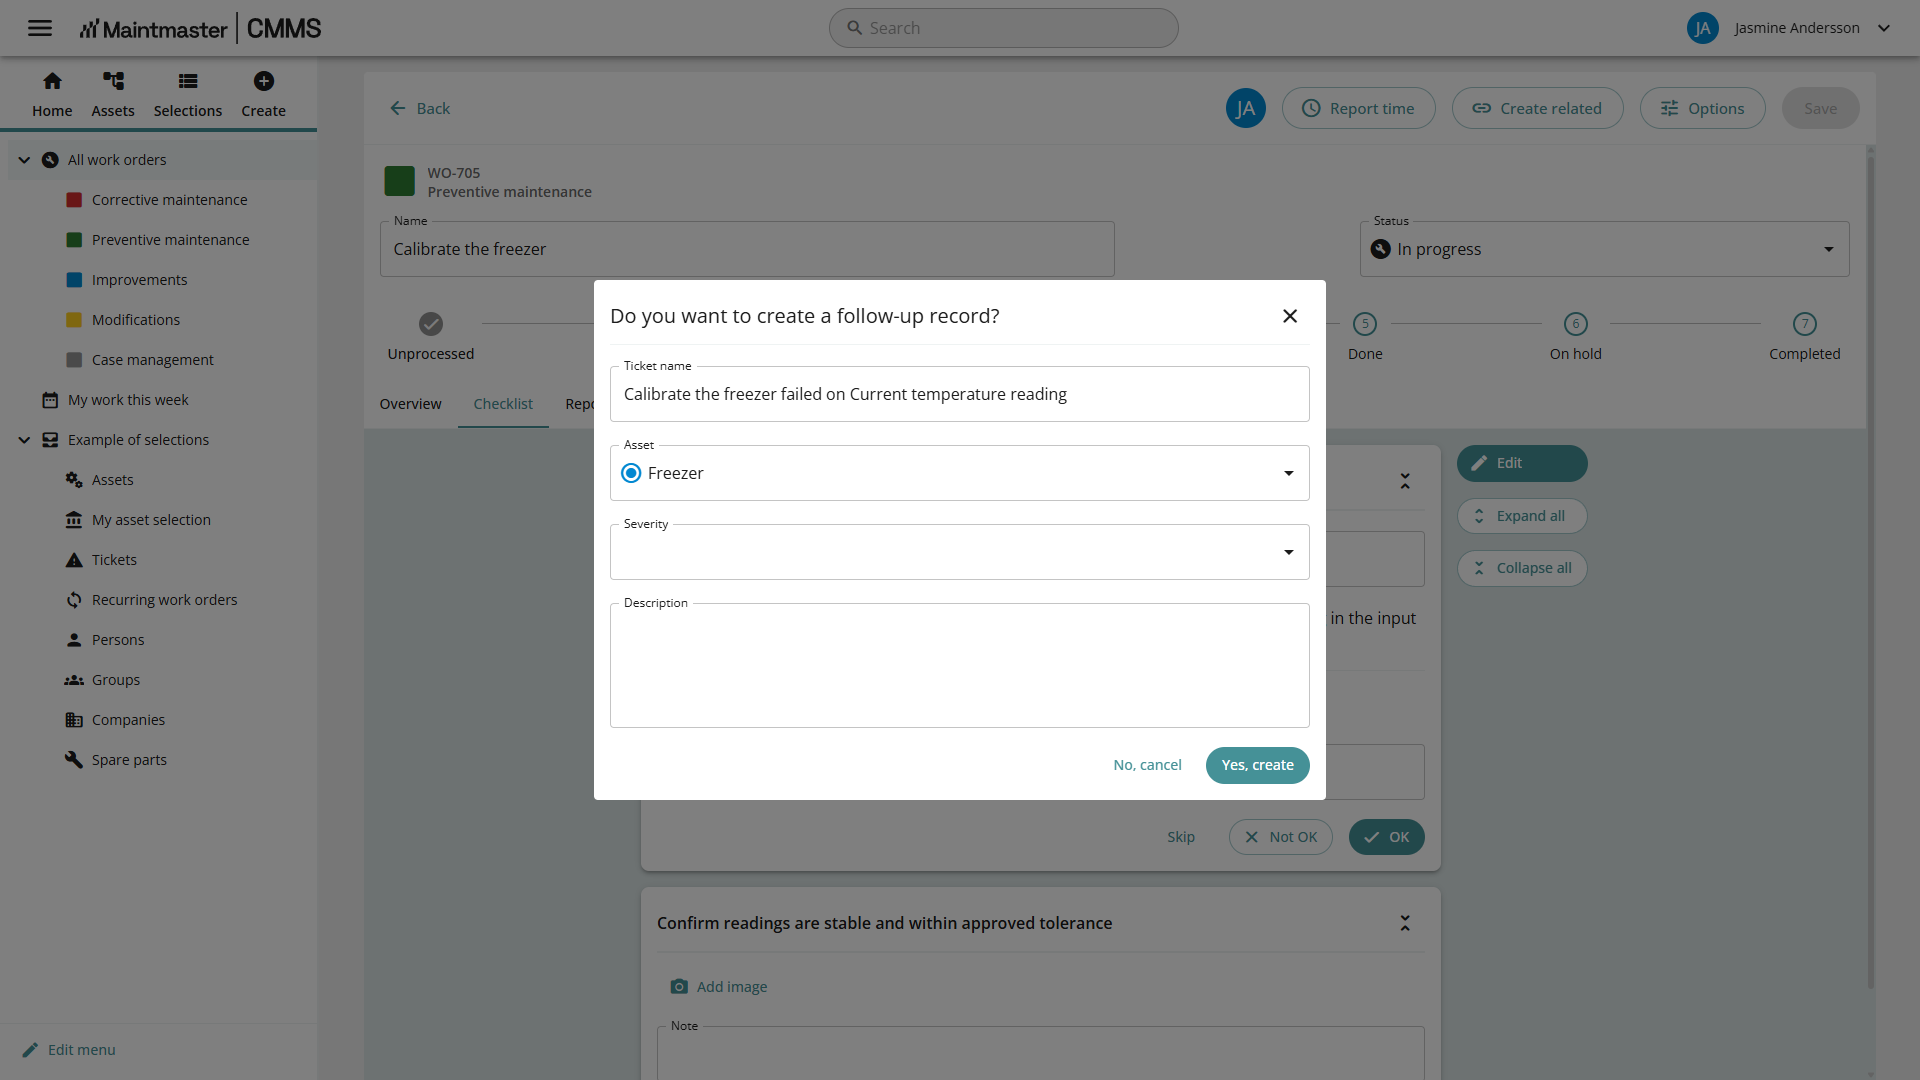
The follow-up arrives with the machine and the failed check already filled in, so the fault does not wait for someone to retype it.
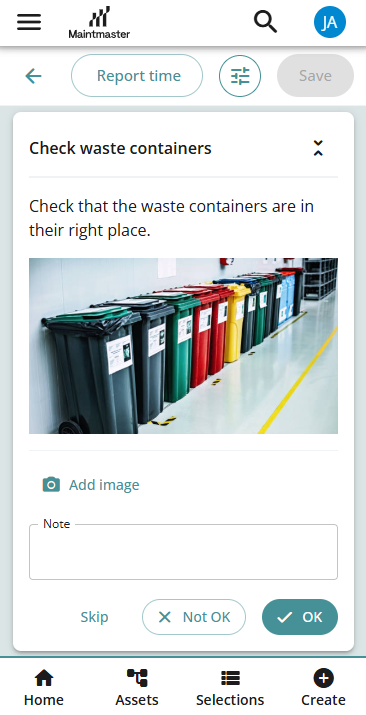
A step can also carry a photo of how things should look, so the technician can compare the machine with the photo instead of relying on memory.
If you are deciding whether paper is still enough, our guide to preventive maintenance software sets out what software has to do for a preventive programme. For the wider case for moving off paper, see how digitalisation improves maintenance efficiency. You can read more about what a CMMS is on our CMMS overview page.
Start with one machine
Pick one asset with a routine you already know. Write its steps so each one can fail, give each a standard, and run the round for a month. Count how many Not OKs it found and how many reached a work order.
Download the preventive maintenance checklist (Excel) and start with that machine. For more on running a preventive programme, our guide to improving your preventive maintenance is the next read.